Taming Your Camera for News Photography
By Gerry Chudleigh
Today all news photography is done with Digital Single Lens Reflex (DSLR) cameras. Most are made by Canon or Nikon. Compared with compact "Point and Shoot" cameras, DSLRs are expensive, large and heavy and they are covered with switches, dials and buttons. Most beginners just set the main dial on a DSLR to "Program" or "Automatic" and rely on the camera to decide the best settings.
What's Wrong With Using the "P" or "A" setting?
When the camera is set to one of the Automatic modes (P, Auto, S, A), the computer inside the camera analyses the light coming through the lens and chooses what it thinks might be the best settings. Why should a photographer take control? Because the camera, no matter how expensive, cannot know what is best in all situations, especially for indoor photography. As a result — even with a $5000 camera — you often get good photos, but you very often get photos that are:
• Blurred and
• Overexposed or
• Underexposed
And unlike you, the camera never learns. If you take a picture of a preacher against a black backdrop and find that the preacher is overexposed, you can take 100 more pictures, or 1,000, and they will all be overexposed. But if you are shooting Manual, you will take one overexposed picture, adjust the shutter speed, then take 99 photos that are perfect. That is just one of many reasons no professional photographers shoot very often in Automatic mode.
Why doesn't the camera get it right? The camera never knows for sure what you want, so it rarely chooses extreme settings. It avoids the widest lens opening and the fastest or slowest shutter speeds. But most church photography is done indoors, in low light — which requires the extreme (but very easy) settings the camera tries to avoid.
In the next few paragraphs you will learn how to shoot manually. While shooting manually seems scary before you try it, it takes all the uncertainty and fear out of getting a good photo. Instead of shooting and hoping, you can shoot and adjust and know you will walk away from every event with a good photo.
But to get those good photos you do need to know just a few things about how cameras work.
Lessons from a Shoebox Camera
You can take pictures with nothing more than a cardboard shoebox, duct tape and something to make a hole in the box — plus film. Not good pictures, but pictures, nonethless. In a darkroom you would tape the film to the inside of the box, on one of the sides. Then tape the top onto the box. Then go outside, set the box down, make a hole in the end of the box opposite the film, leave the hole open for a few seconds, then cover the hole with tape. Your camera work is done. Now develop the film and make a print. The picture won't be good enough to print in your church paper, but you will know what the box was aimed at.
If I handed you a shoebox camera with the film inside, and you went outside to take a picture, you would soon realize that I had forgotten to tell you two things. You would probably walk back inside and ask two questions. Can you think what those questions are?
1. How large should the hole be?
2. How long should I leave the hole uncovered?
Almost all photography is about those two questions. If you make the hole too big or leave it uncovered too long, the picture will be white — ruined by too much light. If you make the hole too small or leave it open too short a time, the picture will be black -- ruined by not enough light.
Believe it or not, in the 21st century, when a professional photographer walks into a church with the latest and best digital camera, those are still the two main questions the photographer asks: how big should the hole be? How long should I leave it open? If you set your camera to Automatic those are the two questions the computer in your camera will try to answer for you: how big will the lens opening be and how long will it be open? And those are the two things you are going to learn how to set for yourself. In fact, as you will soon see, you will almost always need to think about and adjust only one setting.
For now, I am intentionally ignoring the other variable - what kind of film should I use. When we used film, some films were like blond, blue-eyed Scandinavians -- they burned quickly - while others required more time to tan. On a digital camera the sensors can be set to respond quickly or slowly to light. We will talk about that later.
You may want to get your camera out right now, turn it on, and set it to manual mode. Even though you haven't adjusted anything yet, the camera is set to something. If you press the shutter button half way, without taking a photo, you will probably see two numbers, one with an F in front of it. If the display says, for example, "F/5.6" and "60" the camera is set to a medium lens opening (F/1:5.6) and the lens will stay open 1/60th of a second.
Question One: How Big Should the Hole Be?
The word for the size of the hole is aperture. Aperture is measured in F-stops. The larger the number is, the smaller the opening in the camera's shutter.
That seems weird, doesn't it? Why didn't they make it so the larger the opening is, the larger the number? It is because this number is a ratio or fraction. A ½ inch pipe is bigger than a 1/16 inch pipe and the larger the number under the one, the smaller the pipe. Aperture works the same way.
If you had enough money, you could buy a lens that could let ALL the available light through the lens, so there would be as much light inside the camera as outside. That lens would have an aperture ratio of 1:1, which lens makers would call F/1:1. But everyone else would call it F1, omitting the first "1" and the colon. If you lived in an all glass house, there would be as much light inside as outside. That would be an F1 house.
A lens opening that lets half the light through would be called F/1:2 or F/2. If the lens lets only 1/16th the light through, that would be an F/16 opening. An F-stop of F/1.4 would let in less light than an F/1 lens but more light than an F/2 opening.
Most lenses can be adjusted from a wide opening of, perhaps, F/1.4 - about the size of a half-dollar -- to a very tiny opening of F/16 -- about the size of a thin drinking straw. Most lenses used by professional photojournalists have maximum openings of F2.8. Obviously, the size of the aperture determines how much light gets onto the film. If the hole is too small the picture will be too dark, unless you leave the hole open for a long time, and if the hole is too large the picture will be too light, unless you leave the hole open a very short time.
All this may sound a little complicated, but the practical application is very simple for most indoor church photography: set your camera to manual then open the lens as wide as it will go. And leave it there until the event ends. That leaves only one setting to think about -- how long to leave the hole open. But before we look at shutter speed, there is one more thing to consider about aperture (hole size).
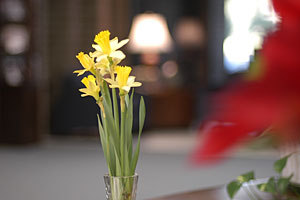
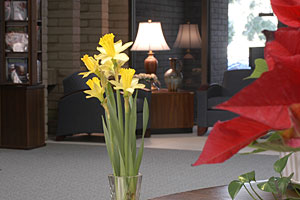
Wonderful Side Affect: There is a very important side affect to how big you make the hole (the aperture). When the aperture is very small, say F/16, almost everything in front of the camera will be in focus, whether it is close to the camera or far away. But when the aperture is very large, say F2.8, only things at a certain distance from the camera - the thing you focused on - will be in focus. Things closer or farther away will be out of focus. This is called depth of field. In both pictures below, the yellow flowers are in focus, but the picture on the left has a very small depth of field, while the picture on the right has a large depth of field. Sometimes a photographer wants everything in crisp focus; sometimes he wants only the subject in focus, with everything else out of focus.
|
|
| f/1.4 @ 1/125th of a second | f/16 @ 1.3 seconds (with tripod) |
| Obviously, the picture on the left was taken with a very large aperture, at a rather quick speed. | This picture was taken with a very small aperture and a very long exposure to get enough light. |
Aperture Application
If you take a photo of a quartet singing, and you want all their faces in focus, and you have the aperture opened wide, you will need to position yourself directly in front of the group, so every person is the same distance from the camera. But if you want to feature only one person and have the others blurred, take the photo from the side, so only the featured person is in focus.
Question Two: How Long Should the Exposure Be?
You know that the longer the hole is left open (longer exposure) the more light gets onto the film, so the darker the room is, the longer you should leave the shutter open. You already set your camera to Manual mode, and you have set your lens wide open at F/2.8 Now all you have to do is find best shutter speed for the person you are shooting. Start with 1/60th of a second and adjust up or down. For perfect pictures, you will have to readjust if the next person on the stage has lighter or darker skin.
Side Affect: You probably already know the side effect of longer or shorter exposures: stopping motion blur. In the two pictures above the great difference in speed had no side effect because the subject was not moving and the camera was on a tripod. But if I had held the camera in my hands for 1.3 seconds the picture taken at that slow speed would have been blurred by camera shake.
Shutter Speed ApplicationFortunately, the shutter speed application is very simple. When I walk into a church to take pictures at a meeting, I set the mode to Manual, I set the lens to F/2.8 and I set the shutter speed to 1/60th of a second. Then I look at the photo to see if it looks right. If it is too bright, I speed up the shutter to 1/80, 1/100 or even faster. If it is too dark, I slow it down to 1/30th of a second or even slower. But pictures taken of a moving subject at 1/30th of a second will almost all be blurred; slower than that, I will usually have to use flash.
Other Options: Program, Aperture Priority, Shutter Priority or Manual
Most DSLR cameras give you these four choices. Here is what they mean:
1. Program or Automatic -- The computer in the camera will decide the shutter speed and lens opening. It will try to pick something midrange. If there is plenty of light and nothing is moving too fast, this setting will work pretty well.
2. Aperture Priority -- This allows you to select how large you want the aperture or lens opening. Then the camera will select the speed. That is how I took the first photos on this page. I set the aperture for the first one at F/1.4 (very big) and the camera selected 1/125th of a second. Then I selected F/16 (very small) and the camera selected 1.3 seconds.
Application: I have found that I usually use aperture priority when I want the fastest possible speed. At an after-dark football game, I can set the aperture to F/2.8 and know that the camera will select the fastest speed necessary to get the correct exposure.
Professional photographers shoot mostly with Aperture Priority when they are not shooting Manual.
3. Shutter Priority -- You pick the shutter speed and the camera selects the correct lens opening. Used when you have plenty of light but want to slow it down to blur the motion or speed it up to stop action.
4. Manual -- My favorite. You select both the shutter speed and lens opening.
>Practice - This is a good time to put what you have learned into practice. If you know what ISO means, leave it set at 200 or 400, if you know what white balance means, leave it set on automatic. If you don't know what those terms mean, don't worry about them. Set your camera to manual, shorten your zoom lens to its shortest length, and set your lens to the widest opening - the lowest F/stop number - probably F/3.5. Take a few pictures inside and see if you can get the right amount of light. How slow can you shoot without blurring the picture? Try 1/30th of a second and 1/15th of a second.
Now go outside and leave the F/stop at the widest setting. How fast do you have to speed up the shutter to get the right amount of light? Try your fastest setting. If that is not fast enough, close the lens to F/5.6 of F/8 and then experiment with different shutter speeds.
The Table You Should Understand But Don't Have to Learn
If you were shooting in Manual mode with film, you would have to memorize the table below - to avoid returning to the office with a sack full of over-exposed or under-exposed film. With digital you can just check the picture on the back of the camera and make another adjustment. But it will still be very helpful if you understand the meaning of this table.
Most of the numbers associated with a camera are based on cutting the amount of light in half or doubling it. We already saw that an lens opening of F/2 lets in half as much light as an opening F1, and that a shutter speed of 1/60th of a second will let in half as much light as a shutter speed of 1/30th of a second. This is very convenient because if you take a photo at F/4 with a shutter speed of 1/100th of a second, and the exposure is just right, you know that if you double the aperture size to F/2, you can leave the shutter open half as long (1/200th of a second) and the exposure will still be perfect.
| Aperture | F/1.4 | F/2.8 | F/4 | F/5.6 | F/8 | F/11 | F/16 | F22 |
| Shutter Speed | 1/400 | 1/200 | 1/100 | 1/50 | 1/25 | 1/8 | 1/4 | 1/2 |
What does this mean to you? Well, let's say you are at a brightly lit stage and you have stretched your zoom lens out to the maximum length of 200 millimeters, where your maximum aperture is F/5.6. You are shooting a rapidly moving speaker at 1/50th of a second and all your photos show lots of motion blur. But right next to you is a person shooting with a $1600 F/2.8 lens. He is also shooting at 200mm but his shutter speed is 1/200th of a second, stopping he action for clear shots. What do you do? You can either get out your $350, 50mm, F/1.4 lens and step up closer, or you can boost the ISO, which is our next topic.
Chapter Two: Other Settings
ISO: How Low Can You Go?
We mentioned before that some film "tan" faster than other film. Digital cameras don't have film, but they have made it possible to change the sensitivity of the sensor between every photo. Most cameras allow you to set the ISO as low as 200 or as high as 1600. Some go down to 100 and up to 6400 or even higher. What do these numbers mean? Well start with an ISO of 100 and figure that every time you double the number the sensor requires half as much light. So to continue the illustration above, if you were shooting at an ISO of 400, your shutter speed was 1/50th of a second and you were getting too much motion blur, you can boost your ISO to 800 and shoot at 1/100th of a second, or to ISO 1600 and shoot at 1/200th of a second.
But here is the problem: the higher the ISO the more grain or "noise" there is in the picture. So you lose blur but gain noise. Every new model of DSLR advertises less noise than the previous year's model. I recently retired my Nikon D200 and bought a D300 just because the noise is so much lower in a D300. The improvement is wonderful. I still prefer to shoot with an ISO no higher than 400, but I can now shoot at higher ISO and still print the photo, if I don't crop it too much. The cover photo for the January 2009 Pacific Union Recorder was shot at F/2.8, at 1/80th of a second with an ISO of 1600. It looks grainy, but the same photo inside the magazine, where the whole picture used and printed much smaller, looks fine.
Practical Application: There is still no substitute for expenses lens with fixed F/2/8 aperture.
Do I Need to Understand White Balance?
Cameras are steadily getting better at automatically picking the best white balance, but it is still useful to set it manually once in a while. What is white balance? We all know that if we light a stage with red lights, everything that is white will look red, and everything else will look redder. And if we use all blue lights everything will look blue. But what our eyes don't tell us is that not all white lights are white. That is because our eyes compensate. We know that certain things are white so our brains calibrate that T-shirt as white and we see everything correctly. But our camera sensors do compensate. If the "white" light isn't white, your pictures will all be tinted the actual color of the light - unless you adjust for the actual light color or your camera does it automatically.
Practical Application: I leave my camera set to automatic white balance outdoors and when using flash. And my camera does a good job most of the time adjusting to fluorescent lights. But when stages are lighted with incandescent lights, as they almost always are, I usually set the white balance manually to incandescent to remove a common red or yellowish cast. But if the pictures are just as good with automatic ISO, I set it back to automatic.
The danger of setting the ISO manually is that you may not remember to set it back to automatic when you go outside to photograph the parade. Then all your photos will be a hopeless blue. They can be fixed if you shot in RAW format, but they are ruined forever if you shot in JPEG format.
Should I Shoot in Raw, JPEG or TIFF Format?
I always shoot in JPEG format because at major events I average about 1,000 photos per day. The JPEG format dramatically reduces the file size of photos, making them much quicker to copy to a hard drive, sort, and edit. Besides, I usually upload my photos to the internet just the way they come from the camera so other people can edit them to fit their needs. Not everyone can edit every brand of raw files, and the internet doesn't display them. We tell our photographers to always shoot in the highest quality, largest size JPEG their camera can produce.
But if you use JPEG, make sure you do not lose the original because copies are of lower quality. If you are going to crop and edit the photo, save it first as a TIFF - a format that retains its quality no matter how many times it is copied.
If I were shooting nature shots or only 100 shots of a brief event, I would shoot RAW because that would allow me to make much greater adjustments later.
I never choose to shoot Raw only. My camera allows me to shoot, simultaneously, raw and JPEG. If the JPEG turns out OK, I never look at the raw file.
Focus Settings
News photographers, who work outside a studio with moving subjects they are not directing, cannot focus manually. And they don't need to because today's cameras focus faster and more accurately than a news photographer can focus. Still, there are two settings that tell the camera how you want it to focus.
One setting is manual or single or continuous. We already said we don't use manual, but the other two are both useful in different circumstances. Almost always I use the single shot focus. That allows me to focus on one person, and then hold down the shutter part way while moving the camera to capture two or more people. The camera will continue to focus on the one person. If the camera is set to continuous focus, and I attempt to focus on one person then move the camera to capture two people, the focus will shift to the wall or distant mountain behind and between the two people, and I will discover later that I got a clear picture of a silk plant or wall, with out-of-focus faces on both sides.
The other choice is whether you want to focus on a single point, or a variety of points, or on the overall average. I almost always choose the single point, because when I am shooting in a low light situation, with the lens open to F/2.8 only a small part of the picture will be in perfect focus, and I want to determine what part that is.
Focusing Tips:
- Cameras have a very difficult time focusing in low light. Always focus where there is a line or distinct contract, a hairline, glasses arm, etc.
- When you are shooting with a wide aperture, a person's eyes may be in perfect focus while their nose and ears are slightly out of focus. People connect by making eye contact. When photographing a person from the front, try to focus on their eyes.
Which Lens to Use
- Never buy a lens that does not have a fixed F/2.8 maximum aperture with "image stabilization" or "vibration reduction." Some cameras have the IS or VR built into the camera, but either way, do be without it.
- I travel with only two lenses: a 70-200mm VR 2.8 and a 17-50mm VR 2.8. I paid $1600 for the Nikon 70-200, because it will work on both the small (DX) sensor in the D300 and it will work on a full-size sensor camera, which is what our department's next camera will probably have. I did not buy the $1,200 Nikon 17-55mm 2.8 lens because it will not work on a camera with a full-size sensor. Instead I bought a $450 Tamron lens which works just fine.
- Though I take about 75 percent of my photos with the long lens, the best and most interesting news photos are taken from VERY close with the shorter lens. In may situations the short lens allows you to fill the lens from top to bottom with the main subject, yet still show enough of the environment to tell more of a story.
- Unless your DSLR cost over $2000 (just for the body) it does not have a full-size sensor. The result is that all your lenses act like they are about 50 percent longer than they really are. That is great for your 200mm lens, which acts like a 300mm lens, but is very bad when you want a really wide-angle lens, because your 24mm lens acts like a 26mm lens. That why you want to try to get a lens with a length in the teens - 17mm or 18mm.
Flash
A picture taken with direct flash is unrealistic and seldom pleasant to look at. But when the room is just too dark for flash, use it. Learn to bounce the flash off of ceilings and walls - including the wall behind you. It is sort of like playing pool - look at the ceilings and wall to see if they are close enough and that there is no architectural feature that will block the bounced light.
In smaller rooms I get excellent results with a Gary Fong light diffuser, but the ones that comes with the flash works pretty well, too.
Captions
A news photo without a complete news caption is dead on arrival, and suitable only for being discarded. A new caption includes the name of the person, or several prominent people, in the picture, the hometowns of each person named (unless the story is about people all from the same place), and a brief description of what they are doing. For example: "John Townsend, left, from Enid, Okla., and Sara Brownfield, from Los Angeles, Calif., play bagpipes at the 100th anniversary of Andrews University, Berrien Spring, Mich., December 14, 2008."
How do you get caption information? From one or more of the following sources:
- A photo of their badge, with their face or clothes.
- A photo of the jumbo screen when their face and name are on it.
- A printed program
- The small notebook and pen in your pocket.
For more information
Book: The Better Photo Guide to Digital Photography, by Jim Moike. AMPHOTO Books, New York, 2005.
Magazine: Popular Photography, monthly
Video: Understanding Digital Photography: Release Your Digital SLR's Potential. Nikon, Inc. 2007. SKU #5816.
www.betterphoto.com
www.dpreview.com
www.nikonians.com
www.nikondigitutor.com
www.lexar.com/dp/
www.nikongear.com
www.nikonlinks.com
www.fredmiranda.com
www.nikondigital.org
www.puconline.org - Communication department, Photography